My First Android App: The Development Process

On August 30th, I released Xcerpt, an Android app for sharing links on Twitter attached with an eye-catching image of some content from the link. It’s particularly useful for sharing quotes from web articles. Xcerpt’s goal is to allow you to show what the link contains, making it easier for you to engage your followers with links.
I’ve been working on it on-and-off for about two months (and during exams too!), and I wanted to share my development and design process: what technical problems I faced, what design decisions I made, and what I learned along the way.
The decision to create Xcerpt
In early June, I started following Anil Dash on Twitter. Anil shares a lot of links using an iOS app called OneShot. When I learned about OneShot, the first thing I did was look up whether it had an Android version (nope), and then looked up if there were any similar apps on the Play Store (nope). The decision to make “OneShot for Android” was pretty straightforward from there.
Before Xcerpt, I had some beginner experience with Android dev, but they never made it past the “it just barely works” stage of development.
This project was different. The main appeal was how small the project was. Small meant it was manageable to work on during school. Small meant I could see its development from minimum viable product to fully fleshed out on the Play Store.
The first step: getting input from the user
My strategy from the get-go was to make progress in very incremental steps. In OneShot, you can highlight text on an image. This involved custom touch events and custom views, stuff I had no idea how to do when I started. Instead, I opted to have the user copy and paste text, or select text in a browser and then use the Share button to send it to my app. Not as fancy, much more finicky, but would get the job done. I called that page PasteActivity, the precursor to Xcerpt’s current InputActivity.
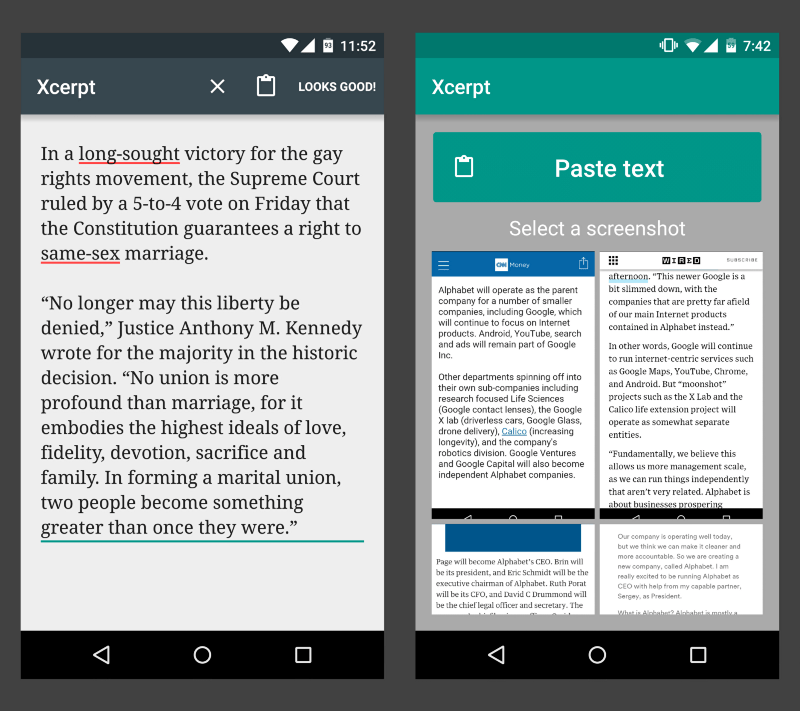
The Paste page, on the left, would eventually become the Input page, on the right.
PasteActivity was just an edit field, with Paste and Delete buttons for the user to make common actions in one tap. With this layout, the user could paste some text and then edit it however they like. In the end, I decided this was too much control over the input for the user; the edge cases where the user would have to manually edit text were too unlikely.
In the current version of Xcerpt, there’s a simple paste button that takes you straight to customizing your image, no other steps involved. Simplicity meant a tradeoff of user input control for speed and intuitiveness.
Where everything happens: The customization page
The interface for the customization page includes tabbed pages for colour selection and source selection at the top, with the preview of the image on the bottom. This design did not really change at all throughout development. I briefly tried out an alternate layout where the Colour and Source pages were in pop-ups, in an attempt to give the image preview more screen space, but ultimately decided the extra taps to open pop ups weren’t worth it. While the design was straightforward, this page was challenging due to how much is going on in the background.
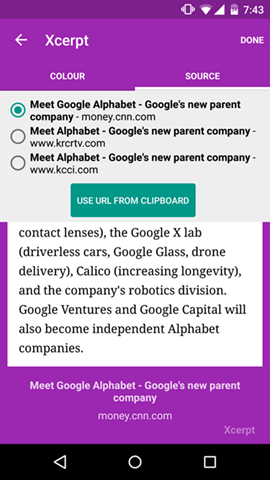
CustomizeActivity, which hardly changed from how it first looked.
Once the user inputs the text they want to share, Xcerpt performs a web search of the text to find its source, then processes the search results to display to the user.
An early dilemma I faced was that most Search APIs cost a lot of money. I pretty much only had one option, Bing, which provides 5000 free searches per month.
One unfortunate “gotcha” of Bing’s Search API is the undocumented max URL length of the API call. I had to use up some precious searches to see how long my query could be before an error is thrown. This was complicated by the fact that certain characters become longer when URL-encoded (for example, a space becomes “%20”). I’m still not sure how I should be handling extremely long inputs at this point.
I pre-process the user’s input a bit before performing a search:
Remove all quotation marks, which Bing would interpret as wanting verbatim search
Replace all whitespace with a regular space, so that there are only single spaces between each search word
Wrap the string (which currently has no quotation marks) in quotation marks so that Bing verbatim searches the entire input for better search results
Xcerpt queries for the top 3 results to provide as options for the user. This was my first time making an asynchronous task in Android, but it wasn’t too long before it worked. Bing returned some JSON that looked like this for each result:
"__metadata": {
    "uri": "https:\/\/api.datamarket.azure.com\/Data.ashx\/Bing\/SearchWeb\/v1\/Web?Query='Alphabet will operate as the parent company for a number of smaller companies, including Google, which will continue to focus on Internet products. Android, YouTube, search and ads will remain part of Google Inc.'&$skip=0&$top=1",
    "type": "WebResult"
  },
  "ID": "c08c9672-75ee-4674-88ee-6df31daeb94b",
  "Title": "Meet Alphabet - Google's new parent company - Aug. 10, 2015",
  "Description": "... as the parent company for a number of smaller ... to focus on Internet products. Android, YouTube, search and ads will remain part of Google Inc.",
  "DisplayUrl": "money.cnn.com\/2015\/08\/10\/technology\/alphabet-google\/index.html",
  "Url": "http:\/\/money.cnn.com\/2015\/08\/10\/technology\/alphabet-google\/index.html"
}
Unfortunately, Bing truncates a title if it’s too long, and I wanted to display the entire title for the user. Additionally, I would prefer to use the OG:Title if the site had one, since it’s the actual title of the web page’s content. So Bing’s title was junk. I had to write another asynchronous task to fetch the HTML from the site and get its title. Sometimes, the HTML results only contained scripts that would load the full HTML later, meaning I wouldn’t find a title. I used the Bing search result’s title as a fallback in this case. Other than this complication, processing the search results simply involved string parsing of the title, DisplayUrl, and URL, which I stored in an Article object.
Sharing to Twitter
Once the user is done customizing, they reach the Share page. I’m pretty proud of the layout of this page; I feel all the information is laid out nicely.
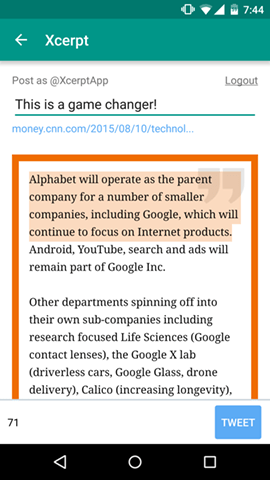
The Share page.
I had a love-hate relationship with the Twitter API when integrating it into Xcerpt. Twitter’s Fabric platform was incredibly friendly to use — the Android Studio extension made adding set-up code as simple as possible. However, some features were limited. Fabric didn’t let you post to Twitter from inside the app. Instead, it would try to open up Twitter’s compose tweet page and fill it in. This meant another tap for the user (press Tweet and then… press Tweet again in Twitter). It also couldn’t attach the image if you used a third-party Twitter app. When I emailed Fabric support asking why this limitation existed, they stated:
We require the composer [in the official Twitter app] just so that users are always aware of what apps are posting on their behalf- they get pretty upset otherwise!
It’s a reasonable argument, but I make it as clear as possible in my app when Xcerpt is tweeting something for you. In the end I had to use the unofficial library twitter4j to post the tweet.
One little feature on this page that OneShot didn’t have: the Tweet button is replaced with a “View on Twitter” button after you’re done tweeting. It streamlines a user’s typical work flow, and it’s a nice touch that OneShot ought to consider adding.
Adding screenshots as an input method
I had completely finished the app at this point. It worked and had a polished look. However, I wasn’t completely satisfied — selecting text on a browser can often be annoying and laggy on poorly made mobile sites, and I hated how this aspect of the user workflow, which I couldn’t control, made using Xcerpt a less than ideal experience. So I started integrating the next feature: providing input with screenshots.
I used Square’s Picasso image library to show a list of screenshots (side note: I love the work Square is doing to create great Android libraries!). For cropping the image, there were plenty of open source image crop tools, but there was a problem with all of them: The crop frame overlay would start out as a small rectangle in the middle of the image. I needed the frame to be as wide as the original image, since the user would mostly be cropping vertically only. I ended up customizing a library for the first time, which was a good learning experience.
Next, I had to read text from the image. To achieve this, I used Tesseract, an open source optical character recognition library. This was a headache to set-up — getting it working involved compiling C++ code so that it would work on Android. Tesseract also needs a huge file (>20MB) to train it to recognize English, which Xcerpt downloads when the user first opens the app.
Sometimes, a user will do something I don’t expect them to do: select an image that doesn’t contain text. Tesseract will look for characters in the image and find gibberish. I didn’t want this gibberish to show up in the customization page. The problem, then, is how can I tell if the string I get from Tesseract is not actual text? I came up with a quick solution that worked surprisingly well: find out what percent of the text is alphanumeric. Some quick testing showed that actual paragraphs were always >90% alphanumeric, while strings from images of Google Maps, phone backgrounds, and my snapchats (all gibberish) varied around 55%. I decided to reject anything below 75%.
At this point I was finally done my first Android app!
What’s next?
Now that I understand Android and Tesseract better, I hope to integrate some improvements to Xcerpt in the future. The next big feature is to use the screenshot itself in the image, like OneShot. This involves highlighting the text on the image directly. Tesseract can provide the coordinates of each character, word, and line. I need to use these coordinates with custom touch events and an overlay of the image to add highlighting.
I’m also listening to feedback from Xcerpt users. One commonly suggested feature that I’ll be adding soon is a “Save Image” button, for when the user wants to make the image but tweet it at a later time.
Special thanks
I got a lot of help designing Xcerpt thanks to the suggestions and support of Camille Macalalad, Andy Baek, David Fu, and Richard Wong. Thanks everyone!
This post was originally posted on Medium. It has been slightly abridged and edited for formatting.